Vert.x: The Reactive Toolkit for Modern Applications
In the realm of modern web applications, responsiveness and scalability are paramount. Vert.x, a toolkit for building reactive applications on the JVM, stands out due to its performance and flexibility. Vert.x is polyglot, allowing developers to use multiple languages such as Java, JavaScript, Groovy, Ruby, Kotlin, and Scala. Its non-blocking nature and event-driven architecture make it an excellent choice for developing high-throughput, low-latency applications.
In this blog, we’ll explore the unique aspects of Vert.x, how it leverages the reactive programming model, and provide examples to illustrate its capabilities.
 Source: Internet
What Makes Vert.x Unique?
Polyglot Support
Vert.x allows developers to write applications in multiple languages, providing flexibility and enabling teams to use the best language for their needs.
Event-Driven and Non-Blocking
Vert.x uses a non-blocking, event-driven model, allowing it to handle many concurrent connections with minimal threads. This leads to better resource utilization and scalability.
Reactive Programming
Vert.x embraces reactive programming principles, making it easier to build responsive, resilient, and elastic applications. It integrates seamlessly with reactive libraries like RxJava and Reactor.
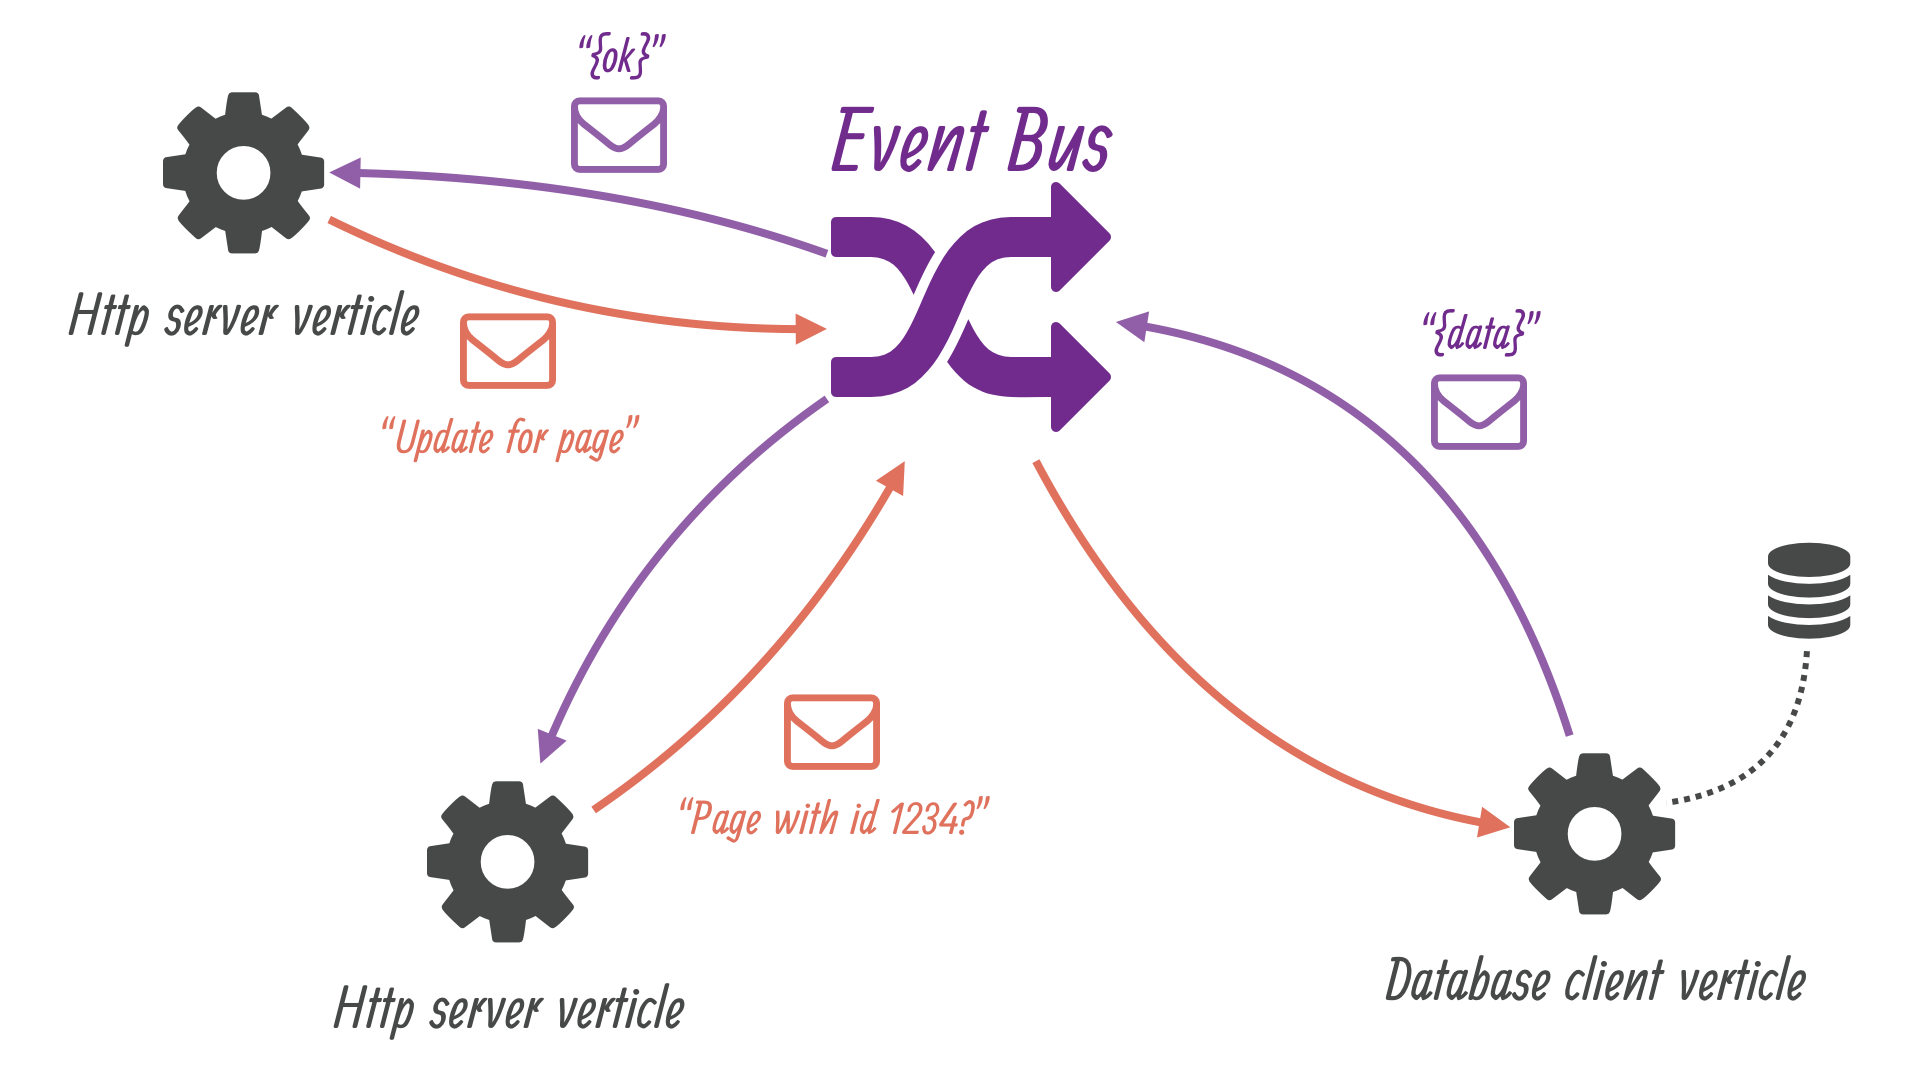
Verticles and Event Bus
Vert.x applications are composed of Verticles, which are units of deployment and concurrency. The Event Bus facilitates communication between Verticles, enabling a highly decoupled architecture.
Module System
Vert.x offers a powerful module system, allowing for easy reuse and deployment of components.
Getting Started with Vert.x
Let’s walk through setting up a simple Vert.x application and explore its features.
Example: Setting Up a Vert.x Project
Project Structure
We’ll create a basic Vert.x application in Java. Ensure you have Maven or Gradle installed.
Maven Project Setup
pom.xml:
<project xmlns="http://maven.apache.org/POM/4.0.0" xmlns:xsi="http://www.w3.org/2001/XMLSchema-instance"
    xsi:schemaLocation="http://maven.apache.org/POM/4.0.0 http://maven.apache.org/xsd/maven-4.0.0.xsd">
    <modelVersion>4.0.0</modelVersion>

    <groupId>com.example</groupId>
    <artifactId>vertx-demo</artifactId>
    <version>1.0-SNAPSHOT</version>

    <properties>
        <maven.compiler.source>11</maven.compiler.source>
        <maven.compiler.target>11</maven.compiler.target>
        <vertx.version>4.3.4</vertx.version>
    </properties>

    <dependencies>
        <dependency>
            <groupId>io.vertx</groupId>
            <artifactId>vertx-core</artifactId>
            <version>${vertx.version}</version>
        </dependency>
        <dependency>
            <groupId>io.vertx</groupId>
            <artifactId>vertx-web</artifactId>
            <version>${vertx.version}</version>
        </dependency>
    </dependencies>

    <build>
        <plugins>
            <plugin>
                <groupId>org.apache.maven.plugins</groupId>
                <artifactId>maven-compiler-plugin</artifactId>
                <version>3.8.1</version>
            </plugin>
            <plugin>
                <groupId>io.fabric8</groupId>
                <artifactId>docker-maven-plugin</artifactId>
                <version>0.34.1</version>
            </plugin>
        </plugins>
    </build>
</project>
Example: Creating a Simple HTTP Server
Main Verticle
package com.example;

import io.vertx.core.AbstractVerticle;
import io.vertx.core.Vertx;
import io.vertx.ext.web.Router;
import io.vertx.ext.web.RoutingContext;

public class MainVerticle extends AbstractVerticle {

    @Override
    public void start() {
        Router router = Router.router(vertx);
        router.route("/").handler(this::handleRoot);

        vertx.createHttpServer()
             .requestHandler(router)
             .listen(8888, result -> {
                 if (result.succeeded()) {
                     System.out.println("Server started on port 8888");
                 } else {
                     System.out.println("Failed to start server: " + result.cause());
                 }
             });
    }

    private void handleRoot(RoutingContext context) {
        context.response()
               .putHeader("content-type", "text/plain")
               .end("Hello, Rishijeet!");
    }

    public static void main(String[] args) {
        Vertx vertx = Vertx.vertx();
        vertx.deployVerticle(new MainVerticle());
    }
}
This simple Vert.x application sets up an HTTP server that listens on port 8888 and responds with “Hello, Rishijeet!” when the root URL is accessed.
Example: Deploying Verticles
Vert.x applications are composed of Verticles. You can deploy multiple Verticles, enabling a modular and scalable architecture.
Worker Verticle
package com.example;

import io.vertx.core.AbstractVerticle;
import io.vertx.core.Promise;

public class WorkerVerticle extends AbstractVerticle {

    @Override
    public void start(Promise<Void> startPromise) {
        vertx.setPeriodic(1000, id -> {
            System.out.println("Worker Verticle: " + Thread.currentThread().getName());
        });
        startPromise.complete();
    }
}
Deploying Verticles
package com.example;

import io.vertx.core.Vertx;

public class MainApp {
    public static void main(String[] args) {
        Vertx vertx = Vertx.vertx();
        vertx.deployVerticle(new MainVerticle());
        vertx.deployVerticle(new WorkerVerticle());
    }
}
Example: Using the Event Bus
The Event Bus allows Verticles to communicate asynchronously.
Sender Verticle
package com.example;

import io.vertx.core.AbstractVerticle;
import io.vertx.core.Vertx;

public class SenderVerticle extends AbstractVerticle {

    @Override
    public void start() {
        vertx.eventBus().send("example.address", "Hello from SenderVerticle!");
    }

    public static void main(String[] args) {
        Vertx vertx = Vertx.vertx();
        vertx.deployVerticle(new SenderVerticle());
    }
}
Receiver Verticle
package com.example;

import io.vertx.core.AbstractVerticle;
import io.vertx.core.Vertx;

public class ReceiverVerticle extends AbstractVerticle {

    @Override
    public void start() {
        vertx.eventBus().consumer("example.address", message -> {
            System.out.println("Received message: " + message.body());
        });
    }

    public static void main(String[] args) {
        Vertx vertx = Vertx.vertx();
        vertx.deployVerticle(new ReceiverVerticle());
    }
}
Conclusion
Vert.x offers a powerful and flexible toolkit for building modern, reactive applications. Its unique features, including polyglot support, non-blocking event-driven architecture, and the Event Bus, make it an excellent choice for high-throughput, low-latency applications. By leveraging Verticles and the reactive programming model, developers can build scalable, maintainable, and efficient applications.
Understanding the power of Vert.x and how to use its features effectively can significantly improve the responsiveness and scalability of your applications. Whether you’re building microservices, real-time web applications, or IoT solutions, Vert.x provides the tools you need to succeed.